


TRAVEL AND ADVENTURE WRITING SAMPLES - all images and text by Guy Bolton
BOARDMAN BIKES - AMBASSADOR AND SPONSORED BIKEPACKING TRAVEL
Project:
Boardman Bikes
Major UK bicycle manufacturer - sponsored travel adventure
Medium: Written article and trip photography


Boardman Ambassador Guy Bolton
on his 1,100km solo bikepacking trip through the UK, Switzerland, and France.


Tell us a bit about yourself, your background, profession, experience with sport and cycling
I’m an adventure and extreme-sports photographer. I grew up on the east coast of Australia. Though over the last few years, I’ve been living between Chamonix and Interlaken, Switzerland as they’re basically the mountain sport capitals of the Alps. I spend most of the year shooting adventure content for the outdoor industry, living in a van, and drinking way too much coffee… Cycling for me is all about the adventure, the ability to travel hundreds of kilometres under your own power is such an incredible feeling. There’s no other way to travel which lets you take in so much of your surroundings in the same way.
My intro into the photography profession came from extended trips in the mountains, often by paraglider while trying to cover distance over multiple days of flying, camping overnight, and hiking when the weather wasn’t suitable for time in the air. The sport teaches you to look at the natural landscape in a whole new way and, with weight being so crucial, gaining a slightly unhealthy obsession with ultralight equipment is standard practice. This style of travel set the basis for most of my photography and helps me carry cameras into some unusual places. Now, that often involves helicopters or other means. However, the human powered stuff is still what really excites me. For me, bikepacking combines the same sense of adventure, with more flexibility on where to go, and not needing to rely so heavily on the weather. Being able to make progress regardless of rain, or any external factors makes it an amazing way to get around and experience the landscape.
Why did you set yourself this goal?
I transit between the Alps and the UK pretty frequently for work, and that usually means driving along the motorways trying to finish the trip as quickly as possible. So even though I’d travelled the distance by car countless times, I had no real idea of what was between the two points. It also didn’t feel right to be relying on motorised transport so heavily - I wanted to prove to myself that I could make the journey under my own power. I guess I don’t like how reliant we are today on motorised transport and wanted to prove a point to myself that there’s an alternative - even if it is harder work.

How did you approach the ride, planning, direction, mileage per day, did you plan stop locations?
I kept the route planning as minimal as possible. Going back to paragliding, one of the really interesting parts of the sport is that you can’t plan an exact route ahead of time. Cloud cover, winds and other external factors all mean that route planning has to happen spontaneously in the air. The result is that you often stumble upon areas that otherwise may have been missed, and from my experience, these are always the ones which leave the best memories. From a photographic perspective, it also keeps the journey interesting as you’re constantly looking out for evolving visuals along the way, instead of just focusing on specific waypoints. I kept the same approach for the ride, planning a very rough route, but adapting it along the way, in case something noteworthy popped up on the horizon.
For navigation, I used the phone application Komoot. Having podcasts, navigation and communication all in one place kept things simple and fool-proof. I only needed to plan stops when I was approaching large towns, so I didn’t end up needing to ride through them at night looking for a camping spot.
How do you pack for a trip like this? What kit did you take with you? Any tips for people planning this kind of trip for the first time?
For me the packing starts with camera gear. This can vary from 2kgs to 20kgs or more depending on the shoot. Different lenses, tripods etc all depend on the subject matter but external factors like weather also come into play. How much space is left, and how much more weight I’m willing to carry help determine what other essential gear is packed like food, tents, sleeping bags etc. Non-essential stuff that just makes the trip more comfortable comes after that.
For this trip I took a very lightweight camping setup as I could risk getting a little cold and wet without any serious safety concerns. For places like the Himalayas or anywhere particularly remote, I’ll take kit which gives me a bigger safety margin for unexpected weather, but with such easy access to towns along the way between the UK and the Alps, it was of little concern.
I chose a Boardman SLR8.9 for the ride, which I rode pretty much just as it came out of the box. I flipped the stem for a more relaxed position and attached some clip-on aero bars so I could mix up the position and take some weight off my hands, but the tyres, wheels and everything else were unchanged.
Keeping the camera and phone charged came from a flexible solar panel and a couple of rugged power banks from Powertraveller. I've been an ambassador of theirs for a while now; the products and team are fantastic. They’re U.K. based too, which helps when I ask for technical advice on bizarre adventure ideas.
What kind of clothing did you wear on the ride?
One pair of bib shorts and one jersey was fine for this ride, though after about a week it’s probably polite to not spend too much time inside cafes… I washed them whenever possible and changed out of them into a light pair of shorts and a t-shirt as soon as I got off the bike each day. A wind-proof jacket, light down-jacket, and merino thermals were enough for the few times the temperature dropped. …oh and a waterproof jacket and pants for the inevitable English rain. I also opted for mountain biking shoes as they’re easier to walk around in without looking like a penguin.


What do you have planned for emergencies?
A basic tool kit was fine. Because the trip was in England, France and Switzerland, even a complete mechanical disaster wouldn’t have caused a safety issue like it might somewhere more remote where you would need to find a way out by yourself. By the end of the 1,100km, I only had one flat, nothing else on the bike needed touching.
I usually travel with 1-2 days worth of food for more flexibility and the occasions when I can't find a place to eat at night. Couscous and dried soup packets are light and easy-to-cook on a small, light-weight camping stove, and a hot coffee in the morning makes getting rolling for the day a lot easier.
I spent most of my working life in a rescue service so my first-aid kit is a little different to the norm, but for anyone heading out on a first adventure the best investment by far is in a decent course. All the kit in the world isn’t much use if you don’t know how to use it. I’ve dealt with the aftermath of people trying to fix problems beyond their skill level and it’s not pretty. Communication is also a big safety essential; there was phone signal the whole ride but for more remote trips a satellite messenger is worth its weight in gold - it’s a potentially life-saving link to an emergency department with a much bigger first aid kit than yours.
What did you think of the bike?
It was fantastic! It’s really nice and compliant which took the edge off old bumpy roads. The geometry was great, not overly aggressive, but still fast. The 105 groupset is bomb-proof and had all the range that I needed for steep climbs or long tailwind flats. I really appreciated the bike’s light weight, essential for the long climbs in the Alps. The adaptability of the bike is fantastic: it’s comfortable enough for seriously long rides, but fast enough to go out chasing personal best’s with. And it just looks mean.

What brought Boardman to your attention, and why did you get in touch?
It was from reading up on some of Chris Boardman’s initiatives around cycling that caught my interest in the brand. Cycling can be an intimidating sport to break into; there are so many ‘rules’ on what to wear, what kind of bike to ride, even how you should wear your socks. I liked Boardman’s more down-to-earth approach, encouraging people to just get outside and enjoy cycling. And when it’s coming from a cyclist with Chris Boardman’s resume of achievements, it’s hard to argue with.
You opted for a road bike over an adventure or gravel bike, what was your thinking behind this?
The expected route for this trip was almost all on tarmac, so a road bike meant I could travel faster for the same effort than a dedicated adventure bike which tends to have more relaxed geometry and wider tyres. It’s often a compromise between comfort and speed but for me the SLR was the best of both worlds. I think the psychological side also played a part as it meant I felt fast - and in my personal experience if you feel fast, you’ll ride fast, and generally enjoy the ride more. That being said, the wide gear-range, comfortable carbon frame, and low-weight were all perfect for the route.
Did you do any pre-flight test rides or training in preparation?
I was training in the lead up with shorter rides so I could incrementally adjust my position on the bike to make sure that I was as comfortable as possible. Once I knew the fit was perfect and that the distances wouldn’t be a problem, I eased off the distance so I could go into the trip feeling fresh.
What was the highlight of the trip?
Seeing the Alps for the first time on the ride was the most memorable. Coming up over a climb and seeing the huge wall of snow-covered mountains is always a powerful sight, but when you’ve traveled there under your own power, it’s just magic. The climbs in the Alps are obviously also breathtaking - long, but breathtaking. I had seen the areas before but going through the passes by bike is a completely different experience.
On the other end of the scale, what was the worst aspect?
Having to go home! I also got stuck in a pretty gnarly thunderstorm in the most rural part of the ride with no cover in sight, which wasn’t much fun.
What advice would you give someone who was looking to make a similar trip
Don’t overthink it. It’s really easy to get overwhelmed by the small details: what gear you need, which route is best, how many kilometres you should cover per day, etc. Prioritise the stuff that really matters -“what do I need to make the trip safe?”- everything that comes after that is up to you. Whether you want to do 20km or 200km per day, carry the bare minimum, or take the kitchen sink, it’s your trip so just focus on what’s going to make it the most fun for you. If you’re enjoying it, you’re doing it right.

RISER PARAGLIDING
Project:
Riser Paragliding
Online instructional and safety articles for pilots travelling to The Alps
Medium: Written articles and photography


ultra.
noun - informal
from latin - beyond
light.
adjective
of little weight; not heavy.
GOING LIGHT -
THE WEIGHT WATCHERS GUIDE TO FLYING
The decision to board the 8:30pm overnight train heading north was made at 7:36pm in Munich - in a country where speedflying is banned all together... Regardless, here I am - on a bike, in the rain, with a wing on my back. Without the advent of ultralight materials and equipment I’d be stuck on foot fumbling around like a pack mule with a 90L packing bag, or be browsing the supermarket for 69 cent noodles to levy the secure hotel room needed to lock away my flying gear. Shedding the pounds has more advantages than you can poke a selfie stick at. You can now travel just like a backpacker and do, ground based, normal things without being inhibited by a 20+kg, 90L monstrosity of a packing bag.

even school harnesses are now being offered in light weight versions
the places you'll go
Why
Do you really need to take the dive into an ultralight set up? If you're only flying local sites or always travel with a car/van, then probably not. However if you are travelling or intend on traveling to remote areas, hiking for extended periods of time, or just being far more flexible - read on...
The Wing
Firstly, the most important part of your kit is not surprisingly going to be your wing. Chances are you already own one so changing to a lighter, more travel friendly model may be out of the question. However, for those who are in the market for some new canvas, here’s the rundown...
There are only two ways to minimise the weight of a wing. Go small, or opt for a model made from ultralight materials/construction. If you’re new to the sport, the first option is out of the question unless you really like the emergency department. The advantages gained by shrinking a wing for beginner to intermediate pilots are so minimal that the disadvantages usually vastly outweigh them regardless of your skill level. Each square meter you shave off a modern miniwing will on average save you a grand total of 100g. Pretty insignificant when you consider how drastically the performance of the wing changes for each square meter lost. - It's probably not worth it
The second and far most convenient option is to pack a full sized, light weight wing. All major manufacturers make them (think Pi, Yeti, Ultralite etc) and they offer the functionality and performance of a 'normal' paraglider at often half the weight. With the emergence of hike and fly competitions even EN-D and CCC rated wings are now offered in ultralight forms - everyone is catered for.
The Harnesses
The Achilles heel of the reversible harness is its versatility
When selecting a harness, there are a few crucial rules to keep in mind with regards to safety and compatibility. Reversible harnesses are a seemingly logical choice however the negatives outweigh any perceived gains. The main selling point with a reversible harness is that you’re fulfilling the role of two pieces of equipment with just one, saving both weight and money. However, in reality a lightweight standalone harness and a lightweight pack will still trump a reversible setup in terms of weight and will usually end up cheaper. Ironically, the Achilles heel of the reversible harness is its practicality. With a reversible harness, transitioning from hiking to flying involves turning your pack inside out and consequently losing all your spare change and keys in the process. A separate harness allows you to remove the bag easily to access lift tickets, snacks, cameras and so on. All paragliding harnesses must pass load testing ensuring a weighted safety factor which exceeds typical flight conditions. This however does not take into account the repeated abuse a harness encounters from speedflying, mountaineering, travelling or harsh conditions. Opt for a simple harness, the fewer adjustments and buckles the better. Test before you buy! All harnesses have a different posture in flight, some will feel more comfortable than others. Just because a harness fits one pilot like a glove doesn't mean it works for everyone. If you're going to be flying with a backpack over the harness, make sure you test it with one on.
Money.
When replacing a piece of equipment with a lighter alternative calculate the weight saved versus the dollar cost. For example; that new ultralight harness might save you 150 grams but its going to cost you 600 big ones, while replacing your parka with a down jacket is only going to cost you $300 and save you 250 grams. Its a meticulous process that’ll leave you craving a caffeine hit but its the only way to ensure you’re getting the best weight saving for the money. Of course - the best way to save your precious pennies and reduce pack weight is to remove unnecessary travel items altogether. Sure that suit jacket makes you feel like Daniel Craig while you’re wearing it, but to everyone else it makes you look like a sweaty mess dragging around an oversized roller bag. Oddly enough, the less equipment you already own the better, as you won’t be buying newer, lighter and inevitably more expensive versions of things you already have.
Everything else...
Every year the choice of equipment to take into the air with you grows. Newer, higher tech varios and trackers, fast packing bags, flying boots, camera mounts, stuff sacks, drones. They all serve a purpose, but there are only 3 pieces of equipment which actually affect your flying. A wing, a harness, and something to connect the two (carabiners/softlinks). Everything else is optional. As a result a flying setup under 3kg is achievable with modern wings.


weight and durability are usually proportional - pack a repair kit
Footwear.
There's a saying from the old hiking guru's that a pound on the feet is worth five in the pack. In non mountain-folk-speak it means that heavy shoes suck. Slowing you down, fatiguing you faster and making for less agile launches. The level of sturdiness you're happy with here will come down entirely to personal preference. Its a weigh up between cushioning, ankle protection and flexibility. A sturdy high ankle boot will protect your ankles however a lightweight trail runner will make you more nimble on launch (I use the latter)
To Sum Up.
Modern materials and technology are making flying rigs lighter and lighter each year. If you're looking to make travel and hiking easier then it's hard to overlook the advantages offered by decreasing the weight of your specific setup. But be warned, its rarely a cheap process. To get the most out of your setup:
- choose a simple, foolproof harness that wont let you down or weigh you down
- compare dollar value for weight saved when exchanging/buying new equipment
- leave unnecessary gear at home. If you can do without. do without
- remove the heavy aluminium frame from your pack, if buying new - go simple
- stay light of your feet - ditch the heavy boots

WHY WE FLY.
When I ask students what drew them to the sport of paragliding, the most popular answer by a considerable margin is “I want to learn hike-and-fly”
It is without a doubt the most pure form of the sport. Your two feet, a paraglider, a harness, and a mountain - nothing more. There are no distractions from just how remarkable our sport is when stripped back to its bare bones. Cars, and gondolas detract from the idyllic solitude only awarded after human powered ascents up the mountain.
“hike to the top of the tallest mountain you can, take off and fly to areas no one has ever been”
...this is the romance and nirvana of flying we dream of as children. An idea that draws a considerable percentage of the flying population to the sport. Why, then, do so many pilots never tackle the prime reason they entered the free-flight world in the first place?
This 4 part series aims to help newer pilots unravel the complexities of stepping away from groomed launches and the safety net of club officers to start venturing into the back country, where the real fun begins.
.jpg)
TRAINING
When we sacrifice the comforts of modern infrastructure (roads, launch sites, retrieve drives) we also sacrifice our safety net. You’re going to be leaving the safety officers and club rules behind and rely on your own ability and intuition. As a result we need to sharpen a few skills that we can get away with overlooking on everyday flying sites.
Launching is without a doubt, the most undervalued skill in paragliding. Most accidents happen on launch, and almost all of them are the result of pilot error. Perhaps the most dangerous factor is not pilot ability, but a pilots perceived ability. The positive reinforcement of leaving the ground leads us to believe that we’re launching at an acceptable level, and the only way we’re going to believe otherwise is if we have an accident.

Launching is the cornerstone of any good pilot’s ability. Can’t launch - can’t fly. Spend as many days at a local training hill as you can. On a single day at a training hill you might inflate and launch and land 50 times. That’s as many launches as your average weekend warrior completes in a year. Launching and landing confidence really is key in the hike and fly world. The greater your ability here, the more launch options open up to you and the more landing options you have for those epic days. Work on your reverse inflations until they’re second nature. You need to be be able to control pitch and direction throughout the entire process.
The key to a good, smooth launch is footwork. Too many pilots rely on inputs with their hands alone to control the wing while we’re still on the ground. In strong winds footwork is mandatory, but it’s still incredibly important in lighter conditions. Sit on launch on a strong day and watch pilots anchor their heels into the ground and attempt to overpower the wing. The added tension on the lines causes the wing to inflate violently and (if it comes up symmetrically) overshoot often resulting in spectacular frontal collapses. Running towards the wing on launch reduces the relative airflow making the wing far more controllable. Ever sat on launch on a strong day and wondered how some pilots make the process look effortless and calm while others are rushed off the ground? - watch their feet.

SKYSAILOR
Project:
SkySailor
Australian National Paragliding magazine
Medium: Travel article and photography


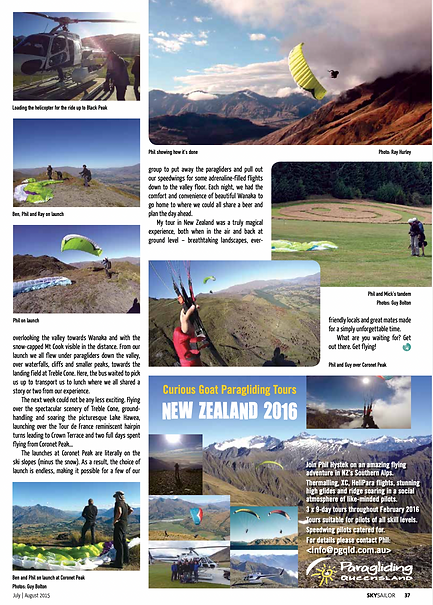
RISER PARAGLIDING - Extreme sports safety article
INTERMEDIATE SYNDROME
How skilled are you at paragliding?
...how do you know?
Intermediate syndrome is likely a term you’ve already heard. It's appeared in articles published by the USHPA (USA), the HGFA (Australia) and the SAC (Canada) to name a few, and is a theory taught by instructors around the world. The commonly description of the theory goes like this:
-
New pilots are cautious - fear levels are high and thus prevent the pilot from pushing into areas which they do not yet know the outcome, resulting in conservative flying habits.
-
Very experienced pilots know where the limits are and don’t push into these areas as they do know the outcome
-
Somewhere in the middle sits the intermediate pilot. Confident enough to push, not knowledgable enough to predict the outcome.
Our definition of the term supports speculation that the phenomenon is paragliding (or at least air sport) specific. This however, could not be further from the truth. Observations of similar cognitive bias were made by Confucius and frequent references are visible since. Why then, does it appear so prevalent in our sport? The answer is simply how observable it is in high risk sports. Let me explain:
Accidents in paragliding attract a disproportionate amount of criticism compared with other activities. A weekend pilot landing in a tree will see a saga of social media analysis and criticism while a football player of a similar level will hear nothing of the pass they dropped during club practice on Thursday night. The mechanism that resulted in the pilot landing in a tree may have been a mistake no greater than that which saw the football player drop the pass. The same inconsistency is unfortunately true of injuries. A major blunder in most sports might result in a lost game. For pilots, it is often serious injury or death. ‘Intermediate syndrome’ is simply a term we have leashed to paragliding as it’s far more observable in sports with a high risk than say, playing football, and likewise, is far more important to understand as the consequences are far greater.
The Dunning-Kruger Effect.
In 1999 David Dunning and Justin Kruger released a study comparing an individuals own perception of their skill ability with rational observations across a range of skill sets and skill levels from amateurs through to professionals. The results displayed a consistent trend of inexperienced groups overestimating their ability while highly experienced groups (professionals in their field) held only marginally higher estimates of their ability than the inexperienced groups and therefore underestimated their ability. In graphical terms, the results looked like this:
percentile

bottom quartile | 2nd quartile | 3rd quartile | top quartile
This graph however, doesn’t completely align with our definition of ‘Intermediate Syndrome’ as it would suggest that the likelihood of making a mistake (and having an accident) decreases in a linear trend from the first day of training through to professional status. The traditional view of the ‘Intermediate Syndrome’ would suggest a trend better represented as:
Theorised effect of fear response
percentile

bottom quartile | 2nd quartile | 3rd quartile | top quartile
The disparity can be explained by including the influence of the human fear response which greatly effects new pilots, preventing them from taking risky actions and reducing confidence, while having less of an influence as experience levels increase. This happens because of a neurological process called extinction, a silencing of the fear response from repeated exposure to an event. The point where fear is at a minimum, perceived ability is at its greatest, and actual ability is at its lowest is where we expect the most accidents to happen. Understanding the fear response explains why the phenomenon only effects pilots once they have spent some time in the sport, and gained some experience.
It's important now to reiterate the demographic which is effected by 'intermediate syndrome'. A pilot enters the bracket once they have sufficient experience in the air to feel comfortable trying new things. Once that pilot reaches a skill level which matches or exceeds their perceived skill level, they leave the bracket. Note that experience and skill are not interchangeable terms within this definition and the point where a pilots overestimation of their ability ends is also not reflective of their actual skill level. For example in the same way a pilot who has just gained their intermediate rating may overestimate their ability, a world class pilot may overestimate theirs compared with rational results, likewise some pilots also fall into the danger area much earlier. The bracket stretches and moves across entirely different ability levels depending on the individual.
How do we know if we're within the 'danger zone'?
Paragliding is simply too diverse to rationally test every facet of a pilots ability. A conclusive test would require examiners to push pilots to the point of failure which for obvious reasons is impractical. The paradox of the Dunning Kruger Effect is that we are unable to know when we are affected, or at least the extent to which it affects us. Knowledge is the only tool to combat it. For those interested in learning more the original paper is available here:
Ted-Ed in conjunction with David Dunning have also created a fantastic online lesson on the study available here
Ted-Ed Lessons - Dig Deeper, David Dunning
What can we do about it?
As pilots we simply need to understand that regardless of our individual ability, we will all fall within the danger area at some point within our flying careers. It does not necessarily begin once we achieve our intermediate rating and does not end once we become experienced pilots, and as such it's popular title as an intermediate syndrome is inaccurate and misleading. It is unique to each pilot and their own psychology. A thorough understanding of how inaccurate our own perceptions of skill are is fundamental in staying safe in the air. On top of this David Dunning provides these tips for countering the effect:
"Ask for feedback from other people, and consider it even if its hard to hear."
"Keep learning. The more knowledgable we become, the less likely we are to have invisible holes in our competence"
